Repairs I've Had to Make
Updated Feb, 2004.
Click Here To See Skill Shot Ramp Repair Section
- Bracket Broken On Ball Guide Rail
This was one I had forgotten about for awhile because the previous
owner had repaired it with duct tape and that repair worked for a long
time. On the sides of the playfield, you have thin metal slats about
one inch tall that serve as boundaries and guide the ball path. On my
machine, two of the L-brackets that were riveted to the the upper right
slat had broken and the slat was held in place with the tape.
First you've got to remove the wireform ramps that run from the
skill shot ramp. It looks difficult, but once you begin to unbolt them,
you will see that they slide right out of the ramp. You can ignore the
ramp that runs from the left VUK to the left slingshot. After you've
gotten those removed, you will have to remove the upper right plastic
(which is probably dirty anyway).
Once all that has been removed, you can unbolt the metal ball guide
slat. I ran into a problem here because all I had handy were brass
L-brackets, but they were going to need to be cut down to work for
this. Lacking the right tools, I decided just to reuse what was left of
the old brackets.

The first thing you will need to do is drill out the old rivets and
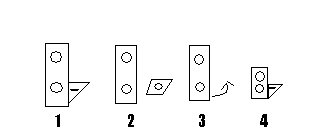
remove the brackets. Looking at picture 1, you can see (vaguely) what
the old L brackets are supposed to look like. Two holes riveted to the
slat, one hole screwed to the playfield. Picture 2 is what my brackets
looked like - snapped at the bend. Take one end of the bracket and bend
it so that it is the right length to screw to the playfield, like in
Picture 3. The playfield hole should line up just fine, but you will
need to drill a new hole into the long part of the bracket to bolt the
slat to, as in Picture 4. Just bolt the bracket into a scrap piece of
wood, hold up the slat to it, mark where the new hole needs to be and
drill it.

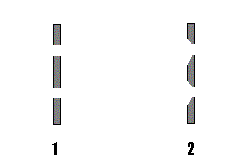
The next thing you have to do is a slight modification to the metal
slats. Since I replaced the rivets with #4 machine screws, I have to
taper the holes so that the machine screws would sit flat. Just take a
drill bit slightly wider than the hole and press down into the hole,
without completely drilling through the metal. You'll end up with a
nice tapered holes as in Picture 2.
If you want to leave the machine as "unmodded" as possible, you
could just drill the bottom hole, but I went ahead and did both
thinking some day I might replace the brackets with something longer
that reached the top hole (and would still be using #4 screws instead
of rivets). If you are going to use rivets, then just leave the holes
as shown in Picture 1.
Once you have done that for all the broken brackets, you're ready
to put it back into the machine. First screw the brackets onto the
playfield, and then run #4 flat head machine screws through the slat
into the bracket. Then, just barely push the bolt through and line up a
lock washer and nut. It will be a tight fit inbetween the playfield
screw and back of the bracket! Screw it tight and your repair is done.
The repaired slats felt rock solid to me without any flex, but if you
want to cut down on the possibility of flexing and absorb some
vibration, I'd stick a piece of high density foam inbetween the slat
and the wooden playfield wall.
No guarantees on how long this will last in home use, but I'd guess I
long, long time.
- 2 Drop Target Bank Not Resetting/Sluggish
Machine will attempt to reset drop target banks twice at the beginning
of each ball and then give up. Many Stargates apparently have a problem
with this when brought in off location - a pain because these are worth
big points. My theory is that the coil used to reset the targets is
barely adequate for this use. The way to fix this is to take the
assembly apart and clean everything. Plunger, coil sleeve, targets,
metal on metal friction points. Be sure and also disconnect and
reconnect the two wire connector for this coil to cut down any
resistance there, too. Stargates can only reset these targets reliably
if the entire assembly is sparkling clean.
After about 10 months of home use, I had the same issue with the
Sarcophagus/Save Sari drop target. A good cleaning has it working
great.
No other Stargate owners have told me they had a problem with
this, but I was pulling my hair out for months! Everytime the left
guardian lifted in the air, he fluttered up and down breaking and
closing the EOS switch on his coil. My first problem was that the hold
winding on my original coil was shot, so I ordered a replacement from
For Amusement Only. The problem still didn't go away even though the
new coil was perfectly within spec. I replaced the switch leafs,
polished the entire assembly, adjusted and readjusted the EOS switch
and none of those made any difference!
Finally I repaired it, and it was all fairly simple. Once again,
another barely adequate coil. First, I tightened the above-playfield
spring that helps lift the guardian about 4 turns and removed the
"plunger return" spring below the playfield (that pushes him back
down). It was working at this point, but looked a little weird since
the guardian didn't have much movement - just barely lifting and
lowering but enough to play the game correctly. I didn't want to
permanently modify the coil return spring, but it was too strong to
leave in the machine as-is. So, I took miniature cable ties and
shortened the coil return spring 3 turns and stuck it back in.
Another issue was that the machine was set too steep. Lowering the
angle to the specifications in the manual made a drastic difference in
Guardian movement (and changed the ramp shots from a fluke occurence to
something that can happen if you nail them just right).
Problem solved!
- Sarcophagus Gate Dragging Across Playfield
This one wasn't a difficult repair, which made the playfield
damage especially aggravating! One of big play features in Stargate is
a gate on the left outlane that opens and closes. If you get a ball in
there, the machine then fires it towards the 3 drop target bank. It's a
very simple mechanism, but the screw holding the metal gate flap is
prone to getting loose and letting the flap drag on the playfield. On
many machines, this flap is missing entirely.
It wasn't missing on my machine, but the damn thing worked a number on
the paint in that area. Anyway, the fix was to put a little JB Weld on
the threads of the screw and then get it nice and tight. Why this never
occured to the previous owners... I will never know.
That's it! A testament to how reliable and well built Gottlieb System3
machines are!

